This is the third installment of my series on basic Linux skills that every hacker should know. Although some hacking tools are available for Windows and Mac, every real hacker uses Linux—for good reason.
Make sure to check outPart 1 and Part 2 of this series before continuing.
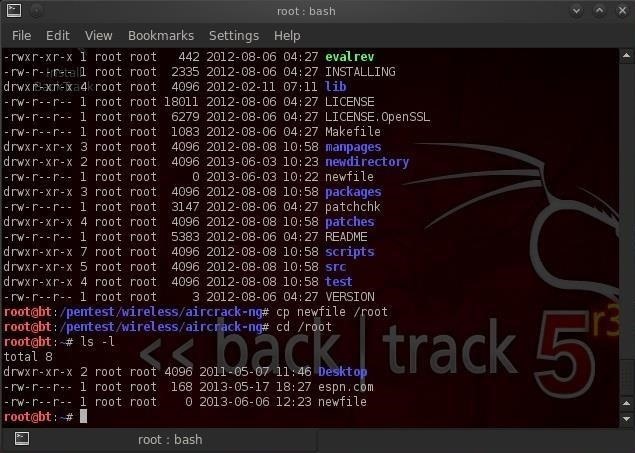
Let's imagine that we need a copy of the file in our home directory, user root. We can do that by:
bt > cp newfile /root
We simply tell Linux copy (cp) the newfile (in our current directory) to the directory of the root user (once again, don't confuse this with the / directory). We don't need to specify the directory that newfile is in, if it's in our current working directory. The copy command makes a copy of the file specified and places it in the specified directory leaving the original untouched and unchanged, so we now have two copies of the original file.
You can see in the screenshot above that when we change directory (cd) to the root user and list the files (ls) that now a newfile copy appears in that directory.
What if we wanted to copy a file from a directory that wasn't in our current working directory? In that case, we would need to specify a path to the directory, such as:
bt > cp /etc/newfile /root
Also, note that we don't need to specify the file name we're copying it to. It simply makes a copy and gives it the same name as the original "newfile."
Step 2 : Moving Files (Mv)
Unfortunately, Linux doesn't have a rename command for renaming files, so most users use the move (mv) command to both move files and rename them. Let's imagine now that we placed that newfile in the wrong directory and we really wanted it in the root (/) directory. We can use the move command to do so.
bt > mv /root/newfile /
This command says, move the newfile from the root user directory to the root (/)directory. The move command literally moves the file and does not leave a copy where the old one existed. Note that the newfile has moved to the root directory.
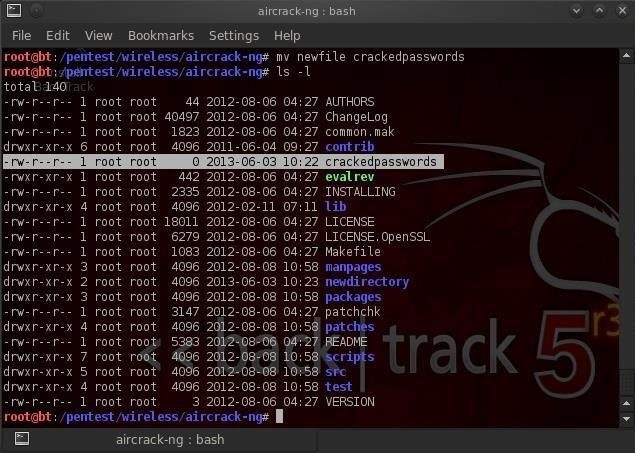
Sometimes, we want change the name of the file and not actually move it to a different location. The move command can be used for that also. We simply tell Linux to move the original file to a new file with a new name. Take for instance our newfile in the aircrack-ng directory. Let's say that we want to rename that file to "crackedpasswords. We can simply type:
bt > mv newfile crackedpasswords
Notice here that I did not use any directory paths because I was moving a file in my current working directory and to a file in my current working directory. If we run a directory listing now, we can see that newfile is gone and crackedpasswords now exists in the aircrack-ng directory.
Step 3 : Viewing Files (Cat, More, Less)
From the command line in the terminal, we can view the contents of files by using the cat command. cat is short for concatenate, which is a $20 word for putting together a bunch of pieces (we are putting together the words for display on the screen). Concatenate is a fancy word, but is used throughout computer science and information technology, so add it to your vocabulary.
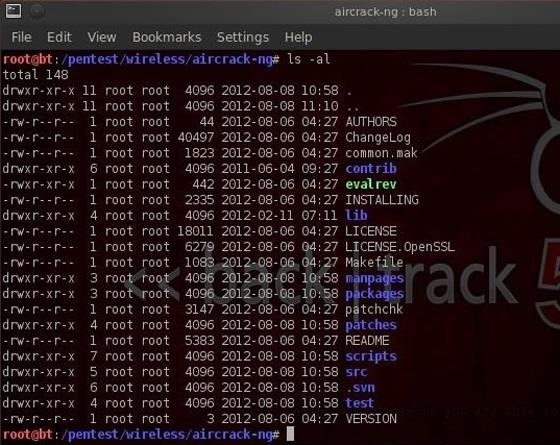
Staying in the /pentest/wireless/aircrack-ng directory, let's cat some files. First, let's get a listing of files in this directory.
Notice in the screenshot above, there is a file called README. Often, software developers use this file to provide important notes to their users. This file can be critical, especially with hacking tools because most are open source and seldom have manuals. Let's take a look at the contents of this file.
bt > cat README
When you run this command, you'll see lots of text running across your screen. Obviously, it goes by way too fast to read, but when its done, we could use the scroll button on the terminal to scroll up to read all the text. There is another way, though, that might be easier.
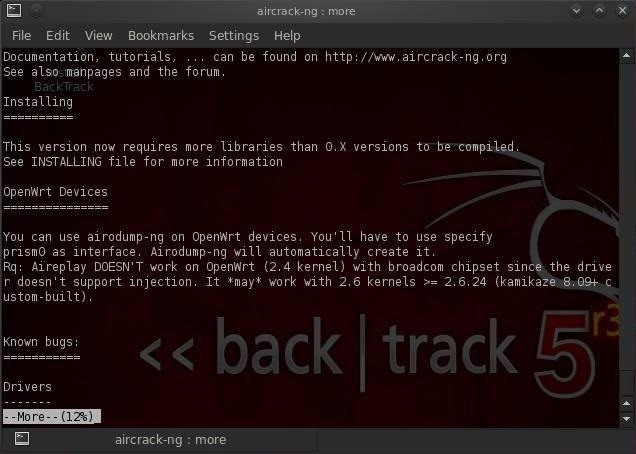
There are two commands that work similar to cat but don't simply run the text across the screen until it hits the end of file. These are more and less. They are very similar, each only displaying one page of information on your screen until you prompt it to scroll down. Let's try more first.
bt > more README
As you can see, when I use more and the filename, it displays the file until the screen fills and waits for further instructions from me. If I hit enter, it will scroll down one line at a time, while if I hit the spacebar, it will scroll one page at a time.
Now let's try the more powerful less (in some Linux circles, there is a saying "less is more", meaning that less is more powerful than more).
bt > less README
You can see that less followed by the filename, once again displays the README file until it fills up my terminal just like more. Though, note that less displays the name of the file that I'm viewing in the lower left-hand corner. Probably more importantly, less has powerful text searching capabilities that are missing from more. I can search for text within this file by typing the forward slash followed by what I'm searching for and less will find it and highlight it for me.
That's one of the primary reasons I prefer less.
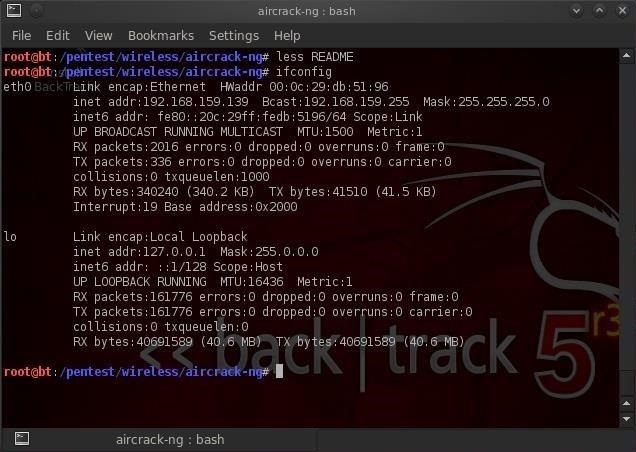
Step 4 : Networking (Ifconfig)
Before I finish this tutorial, I want to show you one last simple networking command, ifconfig. Those of you comfortable with Windows networking, know that you can use the ipconfig command in Windows to display key information on your networking configuration. ifconfig in Linux is very similar, with only one letter different. Let's run ifconfig see what it tells us.
bt >ifconfig
As you can see, it displays much of the key info I need to know about the network configuration of my system including IP address, netmask, broadcast address, interfaces, MAC address of my interface, etc. We'll spend some more time with networking in future Linux tutorials.
In my first tutorial on Linux basics, I discussed the importance of Linux and the structure of the directory system. We also looked briefly at the cd command. In this second Linux guide, I'll spend a bit more time with changing directories, listing directories, creating files and directories, and finally, getting help.
Step 1 :- Change Directory (Cd)
We can change directories in multiple ways with cd. As I showed you in my previous article, we can use cd .. to move up one level in the directory tree. We can also move directly to the root directory by typing cd / or move to our home directory by cd ~.
More often, we will use cd to move to a directory by using the absolute path of the directory. This mean that we write out the entire path of the directory we want to move to after cd. We can also move to the directory by using the relative path of the directory. This means that we don't need to write the entire path, but simply use the path that we're currently in and append to it. Let's look at some examples.
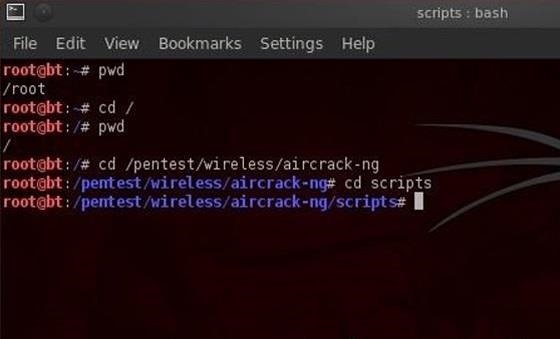
Let's say we're in our root user directory in BackTrack and we want to move to the aircrack-ng directory (we'll be doing some aircrack tutorials soon). We can simply type:
bt > cd /pentest/wireless/aircrack-ng
This will take us directly to the aircrack-ng directory.
Now let's say we want to go to the scripts sub-directory within aircrack-ng. We could type out the full path to the sub-directory, but it's much simpler to type the relative path from where we are. We know we are /pentest/wireless/aircrack-ng, so type:
bt > cd scripts
And that takes us to the scripts sub-directory within aircrack-ng or /pentest/wireless/aircrack-ng/scripts.
Once again, it's critical to emphasize that Linux is case sensitive, so typing the directory without the proper case will result in the error message, "no such file or directory".
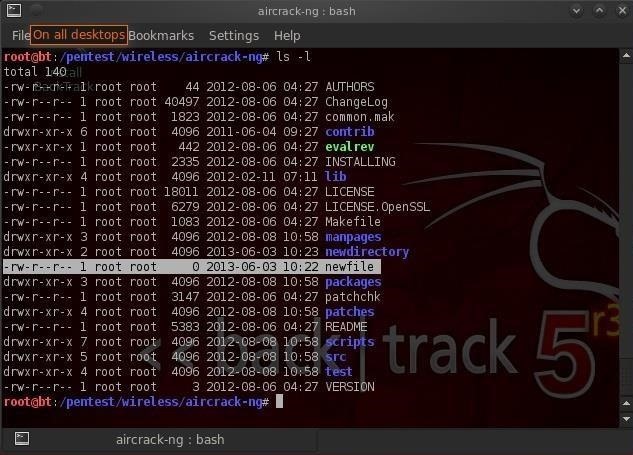
Step 2 :- Listing Command (Ls)
Once of most used and important commands in Linux is ls or list. This command is used to list the contents of a directory or sub-directory so that we can see the contents. It's very similar to the dir command in Windows. So let's use it in the aircrack-ng directory;
bt > ls
We can see that Linux listed all the files and directories within the aircrack-ngdirectory. Linux allows us to modify its commands by using switches; these are usually letters preceded by the dash (-). With ls, it's helpful to use two of theses switches, -a and -l.
The -a switch means all, so when we use it, Linux will list all files and directories, even those that are hidden. When we use the -l switch, it gives us a long listing, meaning it gives us info on the security permissions, the size, the owner, the group of the file or directory, when it was created, etc.
Let's type:
bt > ls -la
We'll examine more closely the security permissions in a later tutorial, but you must know that you need execute (x) permission on any file you want to execute. So, if you download a new tool, you must make certain that you have execute permission on it.
Step 3 :- Create a File (Touch)
The create a file in Linux, it's a bit different from Windows. In Linux, we use the touch command. So, let's create a new file called newfile:
bt > touch newfile
Now we can check to see if that file exists by doing a directory listing:
bt > ls -la
We can see that new file has been created!
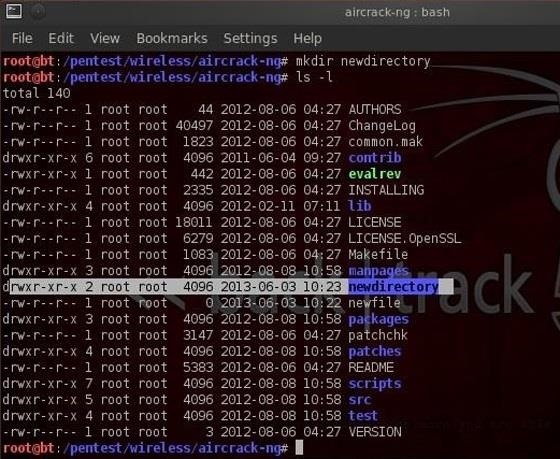
Step 4 :- Create a Directory (Mkdir)
Similar to Windows, we can create a directory by using the make directory command(mkdir). Let's now make a new directory.
bt > mkdir newdirectory
Now type ls and we can see that a new directory has been created
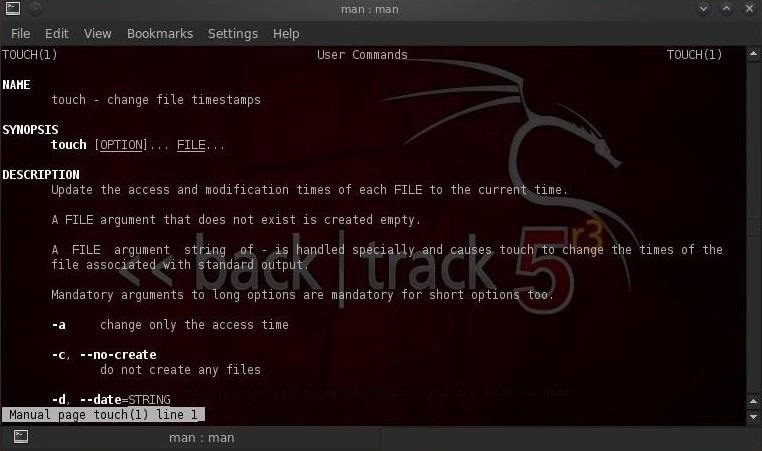
Step 5 :- Getting Help (Man)
Linux has a very useful utility called man. Man is the manual for nearly every command. If you should forget what a command does, simply type man and the name of the command and it will display the manual with all the info you need about that command, its switches, and arguments. For instance, type:
bt > man touch
With most commands, you can also use either the -h switch or the --help switch after the command to obtain "help" about a particular command. In the case of "touch", we must use the --help to obtain help on the touch command.
bt > touch --help
And that's it for this brief tutorial on Linux . Make sure to check out the first part if you haven't already.
I'll be going more into depth in my next tutorial, so keep coming back! Vivaan Shrivastav
IF you've never worked with linux before,you may beonfused aboutwhyso any differentversion are available. I asure you have beencnfused byvarious term such as distribution, Live CD, and GNU when looking at Linux packages. Wading through theworld of Linux for the first time can be tricky experience. First four main parts makeup a Linux System :
The Linux Kernel
The GNU utilites
A graphical desktop enviorment
Application Software
Step 1 : Boot up Linux
Once you've booted up BackTrack, logged in as "root" and then type:
bt > startx
You should have a screen that looks similar to this.
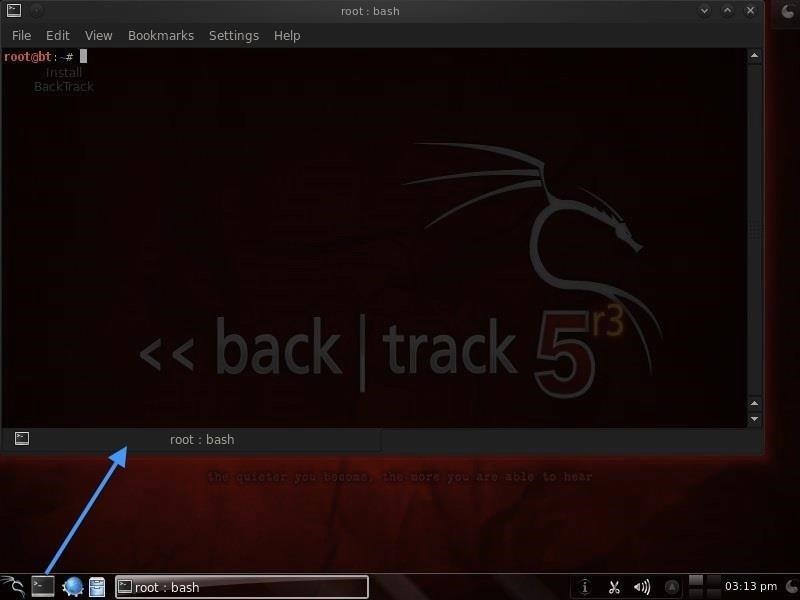
Step 2: Open a Terminal
To become proficient in Linux, you MUST master the terminal. Many things can be done now in the various Linux distributions by simply pointing and clicking, similar to Windows or Mac OS, but the expert hacker must know how to use the terminal to run most of the hacking tools.
So, let's open a terminal by clicking on the terminal icon on the bottom bar. That should give us a screen that looks similar to this.
If you've ever used the command prompt in Windows, the Linux terminal is similar, but far more powerful. Unlike the Windows command prompt, you can do EVERYTHING in Linux from the terminal and control it more precisely than in Windows.
It's important to keep in mind that unlike Windows, Linux is case-sensitive. This means that "Desktop" is different from "desktop" which is different from "DeskTop". Those who are new to Linux often find this challenging, so try to keep this in mind.
Step 3 : Examine the Directory Structure
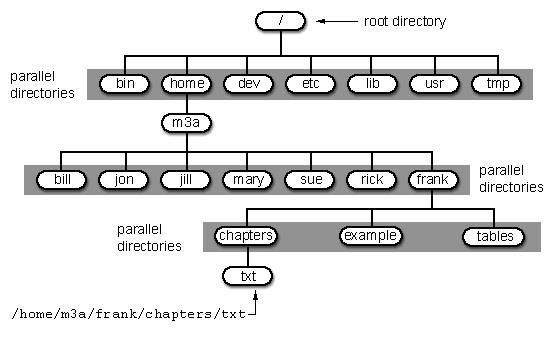
Let's start with some basic Linux. Many beginners get tripped up by the structure of the file system in Linux. Unlike Windows, Linux's file system is not linked to a physical drive like in Windows, so we don't have ac:\at the beginning of our Linux file system, but rathera /.
The forward slash (/) represents the "root" of the file system or the very top of the file system. All other directories (folders) are beneath this directory just like folders and sub-folders are beneath the c:\ drive.
To visualize the file system, let's take a look at this diagram below.
It's important to have a basic understanding of this file structure because often we need to navigate through it from the terminal without the use of a graphical tool like Windows Explorer.
A couple key things to note in this graphical representation:
The /bin directory is where binaries are stored. These are the programs that make Linux run.
/etc is generally where the configuration files are stored. In Linux, nearly everything is configured with a text file that is stored under /etc.
/dev directory holds device files, similar to Windows device drivers.
/var is generally where log files, among other files, are stored.
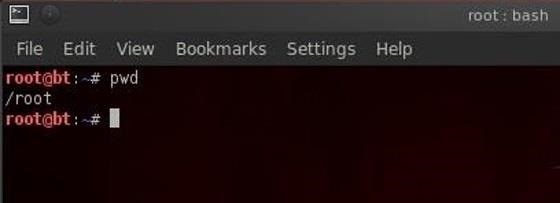
Step 4 : Using PWD
When we open a terminal in BackTrack, the default directory we're in is our "home" directory. As you can see from the graphic above, it's to the right of the "root" directory or one level "below" root. We can confirm what directory we are in by typing:
bt > pwd
pwd stands for "present working directory" and as you can see, it returns "/root" meaning we're in the root users directory (don't confuse this with the top of the directory tree "root." This is the root users directory).
pwd is a handy command to remember as we can use it any time to tell us where we are in the directory tree.
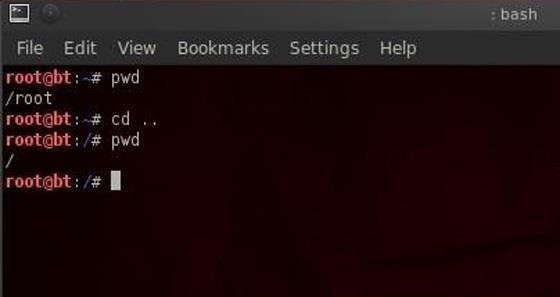
Step 5 : Using Cd Command
We can change the directory we're working in by using thecd(change directory) command. In this case, let's navigate "up" to the top of the directory structure by typing:
bt > cd ..
The cd command followed by the double dots (..) says, "move me up one level in the directory tree." Notice that our command prompt has changed and when we type pwd we see that Linux responds by telling us we are in the "/" or the top of the directory tree (or the root directory).
bt > pwd
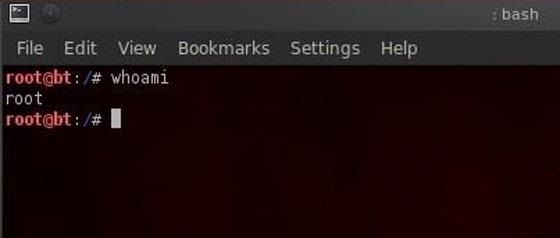
Step 6 :- Using the WHOAMI command
In our last lesson of this tutorial, we'll use the whoami command. This command will return the name of the user we're logged in as. Since we're the root user, we can log in to any user account and that user's name would be displayed here.