Friday, 15 February 2019

LINUX-FU: RUNNING COMMANDS

LINUX-FU: RUNNING COMMANDS


One of the things that makes Linux and Unix-like systems both powerful and frustrating is that there are many ways to accomplish any particular goal. Take something simple like running a bunch of commands in sequence as an example. The obvious way is to write a shell script which offers a tremendous amount of flexibility. But what if you just want some set of commands to run? It sounds simple, but there are a lot of ways to issue a sequence of commands ranging from just typing them in, to scheduling them, to monitoring them the way a mainframe computer might monitor batch jobs.
Let’s jump in and take a look at a few ways you can execute sequences from bash (and many other Linux shells). This is cover the cron and at commands along with a batch processing system called task spooler. Like most things in Linux, this isn’t even close to a complete list, but it should give you some ideas on ways to control sequences of execution.

FROM THE SHELL


The easiest but perhaps least satisfying way to run a bunch of commands is right from the bash shell. Just put semicolons between the commands:
date ; df ; free
This works for many shells that look more or less like bash. For a simple set of commands like that, this is fine. Each one runs in sequence. However, what if you had this:
Bad example of bash code. We've made this an image to prevent copy/paste.
You want to erase all the files in foo (but not subdirectories; you’d need -r for that). But what if the cd fails? Then you’ll erase all the files in whatever directory you happen to be in. That’s a bad idea and violates the law of least astonishment.
The solution is to use the && operator. Just like in C, this is an AND operator. Nearly all Linux programs return a 0 error status for true and anything else is false. That allows programmers to return an error code for failure and it becomes a false. So consider this:
cd /foo && ls   # not rm so we don't do anything bad by mistake
If /foo exists, the cd command will return 0 which is true. That means the result of the AND could be true and therefore execution continues with the ls. However, if the cd fails, the result will be false. If any input to an ANDfunction is false, the other values don’t matter. Therefore, as soon as anything returns false, the whole thing stops. So if there is no /foo, the ls command won’t execute at all.
You can use more than one set of these operators like:
Bad example of bash code. We've made this an image to prevent copy/paste.
There’s also an OR operator (||) that quits as soon as anything returns true. For example:
grep "alw" /etc/passwd || echo No such user
Try your user ID instead of alw and then try one that isn’t good (surely you don’t have a user named alw). If the grep succeeds, the echo doesn’t happen. You can even mix the operators if you like. If you have a lot of commands that take a long time to run, this may not be the best answer. In that case, look at Spooling, below.
You probably know that you can push a running command into the background by pressing Control+Z. From there you can manipulate it with fg (move to foreground), bg (run in background), and kill commands. All of those techniques work with chained commands, too.

TIMING


Sometimes you want to run commands at a predetermined time interval or at a particular time. The classic way to manage timed execution is cron. Many distributions provide predefined directories that run things every hour, every minute, etc. However, the best way is to simply edit your crontab. Usually, you’ll create a script and then use that script in the crontab, although that’s not always necessary.
The crontab is a file that you must edit with the crontab command (execute crontab -e). Each line that isn’t a comment specifies a program to run. The first part of the line tells you when to run and the last part tells you what to run. For example, here’s an entry to run the duckdns update program:
*/5 * * * * ~/duckdns/duck.sh >/dev/null 2>&1
The fields specify the minutes, hour, day of the month, month and day of the week. The */5 means every 5 minutes and the other * mean any. There’s a lot of special syntax you can use, but if you want something easy, try this crontab editor online (see figure).
One problem with cron is that it assumes your computer is up and running 24/7. If you set a job to run overnight and the computer is off overnight, the job won’t run. Anacron is an attempt to fix that. Although it works like chron (with limitations), it will “catch up” if the computer was off when things were supposed to run.
Sometimes, you just want to run things once at a certain time. You can do that with the at command:
at now + 10 minutes
You will wind up at a simple prompt where you can issue commands. Those commands will run in 10 minutes. You can specify absolute times, too, of course. You can also refer to 4PM as “teatime” (seriously). The atq command will show you commands pending execution and the atrm command will kill pending commands, if you change your mind. If you use the batch form of the command, the system will execute your commands when the system has some idle time.
If you read the man page for at, you’ll see that by default it uses the “a” queue for normal jobs and “b” for batch jobs. However, you can assign queues a-z and A-Z, with each queue having a lower priority (technically, a higher nice value).
One important note: On most systems, all these queued up processes will run on the system default shell (like /bin/sh) and not necessarily bash. You may want to explicitly launch bash or test your commands under the default shell to make sure they work. If you simply launch a script that names bash as the interpreter (#!/usr/bin/bash, for example), then you won’t notice this.

SPOOLING


Although the at command has the batch alias, it isn’t a complete batch system. However, there are several batch systems for Linux with different attributes.  One interesting choice is Task Spooler (the task-spooler in the Ubuntu repositories). On some systems, the command is ts, but since that conflicts on Debian, you’ll use tsp, instead.
The idea is to use tsp followed by a command line. The return value is a task number and you can use that task number to build dependencies between tasks. This is similar in function to at, but with a lot more power.  Consider this transcript:
alw@enterprise:~$ tsp wget http://www.hackaday.com
0
alw@enterprise:~$ tsp
ID State Output E-Level Times(r/u/s) Command [run=0/1]
0 finished /tmp/ts-out.TpAPIV 0 0.22/0.00/0.00 wget http://www.hackaday.com
alw@enterprise:~$ tsp -i 0
Exit status: died with exit code 0
Command: wget http://www.hackaday.com
Slots required: 1
Enqueue time: Fri Jun 9 21:07:53 2017
Start time: Fri Jun 9 21:07:53 2017
End time: Fri Jun 9 21:07:53 2017
Time run: 0.223674s
alw@enterprise:~$ tsp -c 0
--2017-06-09 21:07:53-- http://www.hackaday.com/
Resolving www.hackaday.com (www.hackaday.com)... 192.0.79.32, 192.0.79.33
Connecting to www.hackaday.com (www.hackaday.com)|192.0.79.32|:80... connected.
HTTP request sent, awaiting response... 301 Moved Permanently
Location: http://hackaday.com/ [following]
--2017-06-09 21:07:53-- http://hackaday.com/
Resolving hackaday.com (hackaday.com)... 192.0.79.33, 192.0.79.32
Reusing existing connection to www.hackaday.com:80.
HTTP request sent, awaiting response... 200 OK
Length: unspecified [text/html]
Saving to: ‘index.html’

0K .......... .......... .......... .......... .......... 1.12M
 50K .......... .......... .......... ... 6.17M=0.05s

2017-06-09 21:07:53 (1.68 MB/s) - ‘index.html’ saved [85720]
The first command started the wget program as a task (task 0, in fact). Running tsp shows all the jobs in the queue (in this case, only one and it is done). The -i option shows info about a specified tasks and -c dumps the output. Think of -c as a cat option and -t as a tail -f option. You can also get output mailed with the -m option.
Typically, the task spooler runs one task at a time, but you can increase that limit using the -S option. You can make a task wait for the previous task with the -d option. You can also use -w to make a task wait on another arbitrary task.
If you look at the man page, you’ll see there are plenty of other options.  Just remember that on your system the ts program could be tsp (or vice versa). You can also find examples on the program’s home page. Check out the video below for some common uses for task spooler.
Like most things in Linux, you can combine a lot of these techniques. For example, it would be possible to have cron kick off a spooled task. That task could use scripts that employ the && and || operator to control how things work internally. Overkill? Maybe. Like I said earlier, you could just bite the bullet and write a script. However, there’s a lot of functionality already available if you choose to use any or all of it.



Thursday, 24 January 2019

Linux Basics (Managing Directories and Files)

Linux Basics (Managing Directories and Files)

This is the third installment of my series on basic Linux skills that every hacker should know. Although some hacking tools are available for Windows and Mac, every real hacker uses Linux—for good reason.

Make sure to check out Part 1 and Part 2 of this series before continuing.


Step 1 : Copying Files (Cp)

In my previous installment in this series, we created a file called newfile in the /pentest/wireless/aircrack-ng directory.
Let's imagine that we need a copy of the file in our home directory, user root. We can do that by:
  • bt > cp newfile /root
We simply tell Linux copy (cp) the newfile (in our current directory) to the directory of the root user (once again, don't confuse this with the / directory). We don't need to specify the directory that newfile is in, if it's in our current working directory. The copy command makes a copy of the file specified and places it in the specified directory leaving the original untouched and unchanged, so we now have two copies of the original file.
You can see in the screenshot above that when we change directory (cd) to the root user and list the files (ls) that now a newfile copy appears in that directory.


What if we wanted to copy a file from a directory that wasn't in our current working directory? In that case, we would need to specify a path to the directory, such as:
  • bt > cp /etc/newfile /root
Also, note that we don't need to specify the file name we're copying it to. It simply makes a copy and gives it the same name as the original "newfile."

Step 2 : Moving Files (Mv)

Unfortunately, Linux doesn't have a rename command for renaming files, so most users use the move (mv) command to both move files and rename them. Let's imagine now that we placed that newfile in the wrong directory and we really wanted it in the root (/) directory. We can use the move command to do so.


  • bt > mv /root/newfile /


This command says, move the newfile from the root user directory to the root (/)directory. The move command literally moves the file and does not leave a copy where the old one existed. Note that the newfile has moved to the root directory.
Sometimes, we want change the name of the file and not actually move it to a different location. The move command can be used for that also. We simply tell Linux to move the original file to a new file with a new name. Take for instance our newfile in the aircrack-ng directory. Let's say that we want to rename that file to "crackedpasswords. We can simply type:
  • bt > mv newfile crackedpasswords

Notice here that I did not use any directory paths because I was moving a file in my current working directory and to a file in my current working directory. If we run a directory listing now, we can see that newfile is gone and crackedpasswords now exists in the aircrack-ng directory.

Step 3 : Viewing Files (Cat, More, Less)

From the command line in the terminal, we can view the contents of files by using the cat command. cat is short for concatenate, which is a $20 word for putting together a bunch of pieces (we are putting together the words for display on the screen). Concatenate is a fancy word, but is used throughout computer science and information technology, so add it to your vocabulary.
Staying in the /pentest/wireless/aircrack-ng directory, let's cat some files. First, let's get a listing of files in this directory.


Notice in the screenshot above, there is a file called README. Often, software developers use this file to provide important notes to their users. This file can be critical, especially with hacking tools because most are open source and seldom have manuals. Let's take a look at the contents of this file.
  • bt > cat README


When you run this command, you'll see lots of text running across your screen. Obviously, it goes by way too fast to read, but when its done, we could use the scroll button on the terminal to scroll up to read all the text. There is another way, though, that might be easier.
There are two commands that work similar to cat but don't simply run the text across the screen until it hits the end of file. These are more and less. They are very similar, each only displaying one page of information on your screen until you prompt it to scroll down. Let's try more first.
  • bt > more README

As you can see, when I use more and the filename, it displays the file until the screen fills and waits for further instructions from me. If I hit enter, it will scroll down one line at a time, while if I hit the spacebar, it will scroll one page at a time.


Now let's try the more powerful less (in some Linux circles, there is a saying "less is more", meaning that less is more powerful than more).
  • bt > less README


You can see that less followed by the filename, once again displays the README file until it fills up my terminal just like more. Though, note that less displays the name of the file that I'm viewing in the lower left-hand corner. Probably more importantly, less has powerful text searching capabilities that are missing from more. I can search for text within this file by typing the forward slash followed by what I'm searching for and less will find it and highlight it for me.
That's one of the primary reasons I prefer less.

Step 4 : Networking (Ifconfig)

Before I finish this tutorial, I want to show you one last simple networking command, ifconfig. Those of you comfortable with Windows networking, know that you can use the ipconfig command in Windows to display key information on your networking configuration. ifconfig in Linux is very similar, with only one letter different. Let's run ifconfig see what it tells us.
  • bt >ifconfig

As you can see, it displays much of the key info I need to know about the network configuration of my system including IP address, netmask, broadcast address, interfaces, MAC address of my interface, etc. We'll spend some more time with networking in future Linux tutorials.

Vivaan Shrivastav


Sunday, 20 January 2019

Linux Basic Commands

In my first tutorial on Linux basics, I discussed the importance of Linux and the structure of the directory system. We also looked briefly at the cd command. In this second Linux guide, I'll spend a bit more time with changing directories, listing directories, creating files and directories, and finally, getting help.


Step 1 :- Change Directory (Cd)

We can change directories in multiple ways with cd. As I showed you in my previous article, we can use cd .. to move up one level in the directory tree. We can also move directly to the root directory by typing cd / or move to our home directory by cd ~.
More often, we will use cd to move to a directory by using the absolute path of the directory. This mean that we write out the entire path of the directory we want to move to after cd. We can also move to the directory by using the relative path of the directory. This means that we don't need to write the entire path, but simply use the path that we're currently in and append to it. Let's look at some examples.
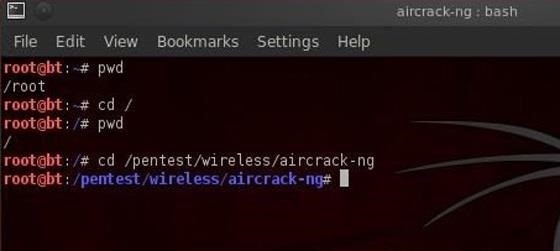
Let's say we're in our root user directory in BackTrack and we want to move to the aircrack-ng directory (we'll be doing some aircrack tutorials soon). We can simply type:


  • bt > cd /pentest/wireless/aircrack-ng


This will take us directly to the aircrack-ng directory.
Now let's say we want to go to the scripts sub-directory within aircrack-ng. We could type out the full path to the sub-directory, but it's much simpler to type the relative path from where we are. We know we are /pentest/wireless/aircrack-ng, so type:
  • bt > cd scripts

And that takes us to the scripts sub-directory within aircrack-ng or /pentest/wireless/aircrack-ng/scripts.


Once again, it's critical to emphasize that Linux is case sensitive, so typing the directory without the proper case will result in the error message, "no such file or directory".

Step 2 :- Listing Command (Ls)

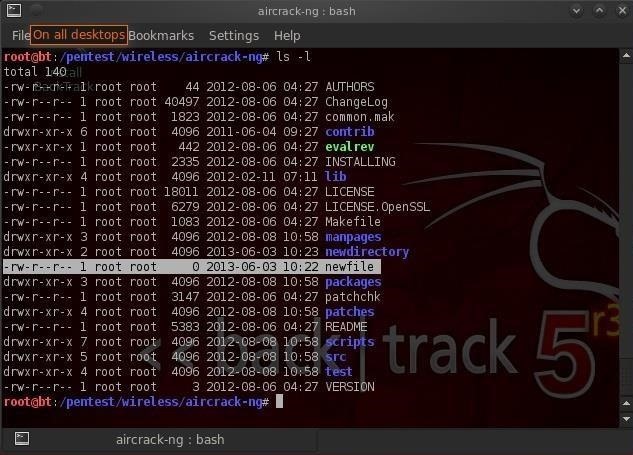
Once of most used and important commands in Linux is ls or list. This command is used to list the contents of a directory or sub-directory so that we can see the contents. It's very similar to the dir command in Windows. So let's use it in the aircrack-ng directory;
  • bt > ls


We can see that Linux listed all the files and directories within the aircrack-ngdirectory. Linux allows us to modify its commands by using switches; these are usually letters preceded by the dash (-). With ls, it's helpful to use two of theses switches, -a and -l.


The -a switch means all, so when we use it, Linux will list all files and directories, even those that are hidden. When we use the -l switch, it gives us a long listing, meaning it gives us info on the security permissions, the size, the owner, the group of the file or directory, when it was created, etc.
Let's type:
  • bt > ls -la


We'll examine more closely the security permissions in a later tutorial, but you must know that you need execute (x) permission on any file you want to execute. So, if you download a new tool, you must make certain that you have execute permission on it.

Step 3 :- Create a File (Touch)

The create a file in Linux, it's a bit different from Windows. In Linux, we use the touch command. So, let's create a new file called newfile:
  • bt > touch newfile
Now we can check to see if that file exists by doing a directory listing:
  • bt > ls -la
We can see that new file has been created!

Step 4 :- Create a Directory (Mkdir)

Similar to Windows, we can create a directory by using the make directory command (mkdir). Let's now make a new directory.
  • bt > mkdir newdirectory

Now type ls and we can see that a new directory has been created 

Step 5 :- Getting Help (Man)

Linux has a very useful utility called manMan is the manual for nearly every command. If you should forget what a command does, simply type man and the name of the command and it will display the manual with all the info you need about that command, its switches, and arguments. For instance, type:


  • bt > man touch

With most commands, you can also use either the -h switch or the --help switch after the command to obtain "help" about a particular command. In the case of "touch", we must use the --help to obtain help on the touch command.
  • bt > touch --help


And that's it for this brief tutorial on Linux . Make sure to check out the first part if you haven't already.
I'll be going more into depth in my next tutorial, so keep coming back!

Vivaan Shrivastav